I’m back from 5-days in Snowdonia having completed my Mountain Leader Assessment (and yes, I passed, yippee).
I wanted to share my experience of the Mountain Leader journey including the assessment process and offer some helpful tips for anyone who’s considering the Mountain Leader Award or planning to take the assessment soon.
For me, gaining the ML award is like passing your driving test, you’re safe to be on the road but the real learning begins. I feel that’s the same with the Mountain Leader Award. I’m safe to be on the mountain but the real learning will occur over the next few years, taking groups out and building on my experience.
In some respect, you’ll never stop learning and as such you’ll become a better Mountain Leader.
Here I’ll briefly talk about my Mountain Leader experience from the training through to my assessment with top tips for things that you might find useful. I’ve also included a basic Mountain Leader kit list. Jump to the ML assessment section in the contents if you wish.
Please feel free to get in touch if you have any specific questions either in the comments below or pop me a questions via my Instagram @beckythetraveller.

Mountain Leader Training
My ML (Mountain Leader) journey began before the training course, there are various things you need to do before you book the course, including the all important minimum 20 QMDs (Quality Mountain Days).
Back in 2020 (during lockdown) I shared a guide for how to begin your Mountain Leader journey. It was aimed at what you could do whilst being unable to travel/go adventuring but there’s loads of useful information in it.
Take a read here – How to get started on your Mountain Leader Training?
After researching different mountain leader providers I chose Paul Poole Mountaineering for my 6-day Mountain Leader Training in September 2019. Bizarrely, I was ridiculously nervous before my training (you might notice a theme here!) However, I had no need to be, it was a training course, I wasn’t expected to be 100% brilliant at everything, even though I had added that pressure to myself!

Over the 6 days, we covered the various points of the Mountain Leader syllabus whilst having a fantastic time and learning loads! Day 1-4 was hikes learning about the nature, geology, history, flora and fauna, navigation skills including pacing, timing etc and rope work. Day 5 and 6, was a mini 2-day expedition, including navigation with a 1:50,000 scale Ordnance Survey map, night navigation and a wild camp.
Top tips for Mountain Leader Training
- Remember it’s a training course, you’re there to learn and not be assessed!
- Make detailed notes, either at the end of each day or whilst you’re out on the hills (if the weather allows it).
- Take extra layers, you spend time standing around chatting on the hills so you can get colder as you’re not moving about as much.

What happens after your training?
This is your consolation period, the time between your Mountain Leader training and your assessment. During this period, you’re out clocking up those QMDs and gaining as much experience as you can in the mountains in different areas of the UK.
Remember the time can vary greatly for different people so don’t put a time limit on this. I’d initially planned to complete my assessment within a year of the training, that didn’t go to plan, mainly due to travel restrictions which meant I couldn’t travel to go hiking.

Push yourself out of your comfort zone, challenge yourself and get out in as many different weathers and conditions as you can. The criteria states 40 QMDs for your Mountain Leader Assessment but the more mountain days you do the more confident you’ll feel on the assessment.
My DLog (Digital Logbook) had about 60 QMDs – there’s no right or wrong here, I’m just sharing my experience :).
I found solo adventures were a great way to tick off lots of the QMD criteria. Also, if you can meet up with like-minded Trainee Mountain Leaders who are happy to go off-path, practice pacing and wander around in the dark together! I found this Facebook group useful in meeting up with fellow hikers – UK Trainee Mountain Leaders
Things to do during your consolidation period
- Buy any extra kit you need during this time, it can add up so worth purchasing as you go along – I’d recommend a good head torch for your night navigation if you don’t have one.
- Book your First Aid course – a good skill to have so worth getting on a course sooner.
- Keep your DLog updated as regularly as you can, makes it easier to manage.

When to book your Mountain Leader Assessment?
Ok, I wasn’t the best at booking mine, if it wasn’t for my friend Emma I might not have clicked the button! Let’s just say I’m an over-thinker and nerves might have played a part in not booking!
For the above reason, I opted to book mine for several months in advance, this meant I had the entire summer and early autumn to get out in the mountains and fine tune my skills and also I needed to complete my outdoor First Aid course.
At the point of booking my assessment I had 40+ QMDs but my plan was to do more in the upcoming months prior to the assessment date.

Other things to book
These aren’t all essential things to book but worth looking at around the time you’re booking your assessment so things line up!
- Accommodation – Once you’ve booked your ML Assessment dates also consider whether you need accommodation – travelling from Nottingham I opted to book three nights so I could travel down the night before.
- ML Refresher Course – Consider if you need/want to do a Mountain Leader Refresher course and book this prior to your assessment date. As my assessment date came closer I decided a refresher would be useful, a chance to fine tune my skills and revise rope work that I’d not really done much on.
- Other courses – Depending on your skill set there are also other courses you can book and it’s worth considering what dates are available. I booked on a Contour Masterclass with Paul Poole – it’s excellent, I would highly recommend. Another course you can book is night navigation, I didn’t book one but it’s something to consider.

Mountain Leader Assessment
I opted to book my assessment with the same provider that I’d done my training with – Paul Poole Mountaineering. You can select someone different but I liked Paul’s style of teaching and felt happy doing my training with him and his team.
Our group was initially four people; however one person cancelled so there were three of us taking the assessment together.
Here I’ll share our itinerary for the 5 days, please bear in mind that other ML providers may do things slightly differently and of course, the weather will impact where you go on your assessment.
Day 1
We met Paul at Moel Siabod Cafe, after chatting over a coffee and introducing everyone Paul shared the plan for the day.
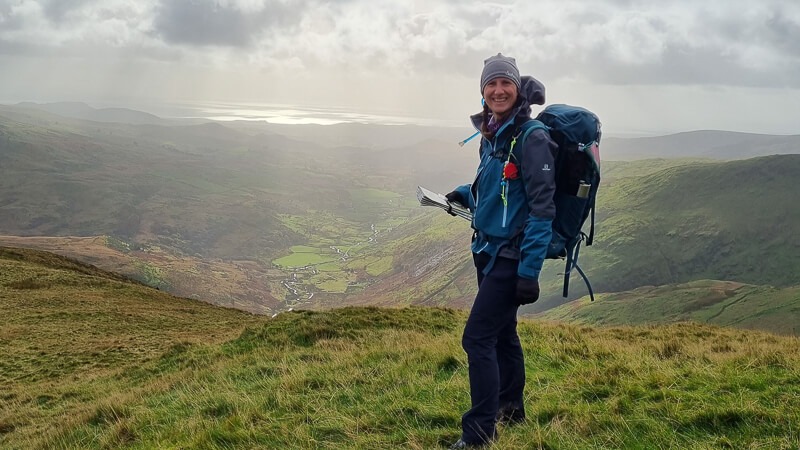
The weather was forecast to be rain and strong winds (50-60 mph wind gusts), unfortunately for us it was spot on! We drove to our start point in Ogwen Valley and Paul re-iterated that the goal was to focus on our own navigation skills using a 1:25,000 scale map. We took it in turns to navigate and relocate on the route, sharing why we had reached our point and what catching feature we were using.

During the day, we talked about other topics including the issue of other hikers ‘following’ you whilst you’re out. Interestingly we had a large group follow us down a rocky route, when there was a perfectly good path they could have used.
Once back down (and out of the crazy wind) we headed back to the cafe where Paul provided a short de-brief and feedback on the day and we started to talk through the homework paper we’d all completed prior to arriving.
Day 2
We began the day at a pre-arranged meeting point near the Nantlle Ridge and set off in a similar format to the previous day (navigating and relocating); however this time we were told to identify and share any hazards we came across on the route that we would point out to a group.

At each point, we also each shared our own Mountain Fact, it could be anything from geology, myths, nature, flora and fauna, wildlife or history. It turned out we all had a fantastic range of knowledge between the three of us so I found I learnt a lot during this process which we repeated throughout the day.
We then reached some steep rocky terrain, we stopped and discussed how we’d manage the situation with a group and you’ve guessed it shortly after we had our ropes out. After we’d all had a turn belaying each other we descended and found a different anchor point and shared the techniques for a solo abseil, using the Classic, South African and Angelwings techniques.

Day 3
Again, we met back at the cafe, it was a later start which was appreciated. We spent a couple of hours going through the remainder of our homework paper, including topics on weather, water hazards and sharing a proposed 3-day expedition we had each planned.
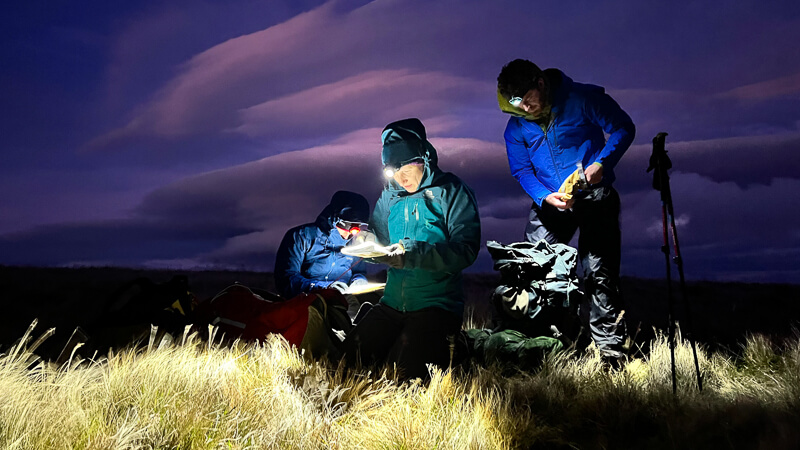
Then it was time to head off on our 3-day expedition. Initially, we had planned to hike to our wild camp spot, set up the tents then do our night navigation exercise. However, with the forecast showing the winds getting stronger and stronger we switched plans to hike from day into night and then set up camp.
Our back up plan was to stay in a nearby bothy if the winds were too strong, and they were, we were blown all over the place as soon as we gained height and at that point Paul confirmed we’d been using the bothy for shelter that night.

We took it in turns to navigate to a point and relocate, also sharing our timings for each leg and prior to it getting dark we shared another Mountain Fact. Once it got dark the only difference from pervious days was the lack of chatting as we made our way from point to point by torchlight and pacing!
Then at 9.30 pm, we arrived at the bothy, prioritised food over conversation and not long after we were all tucked up in our sleeping bags!
Day 4
Today was all about using a different scale map, we had the option to use a OS 1:50,000 or the Harvey’s 1:40,000 scale. I used the Ordnance Survey map.

This morning, we had a new arrival at the bothy, Pete who works for Paul met us and was our assessor for the next two days. Again, the usual routine was one person navigating and the other two relocating, focusing on using the land and contours since on a 1:50,000 scale map there’s not much else.

We discussed what to do in an emergency situation from various different situations from hypothermia to to a broken leg.
Then as we were descending we did Confidence roping, however, instead of a rope we used a 16 foot sling, which I found a great piece of kit to use instead of a rope.

We headed down to find a wild camp spot, once our tents were pitched we covered how you’d manage wild camping with a group and what challenges you could potentially come across. Then it was time for food, get our of our damp clothes and get warm. By 8 pm, I was tucked up in my sleeping bag and ready for bed!
Day 5
We woke up, enjoyed a coffee as we watched the clouds cascade over the mountain top in one direction and the sunrise in the other. Then it was time to pack up and head back to the cars.

Once we were down, we met back up with Paul at, you’ve guessed it, Moel Siabod cafe! Here we were given our feedback from our time on the hills and I’m pleased to say that all three of us passed our Mountain Leader Assessment.
Top tips for your Mountain Leader Assessment
- Take your time on your navigation legs and relocating.
- Show your confidence, plan your route, know your description and catching feature then off you go – there’s no need to check the map every 100 metres.
- Nerves will probably be there but try not to let them overwhelm you (I wasn’t great at this!)
- It’s likely you’ll make mistakes on the assessment but it’s how you deal with them/identify them that’s the good thing – I paced 200 metres then incorrectly measured 6 mm as 200 metres to confirm but then realised my mistake and I was able to relocate.
- Pack plenty of kit, if you get soaked and can’t get things dry then you’ll welcome some fresh clothes – I suffer with extremely cold hands so I took multiple pairs of gloves to swap throughout the day when they got wet.
Mountain Leader kit
This will vary slightly for everyone but here’s what I packed in my Mountain Leader day bag on my assessment. It will be the same kit now that I’m a qualified Mountain Leader and out there with real groups, plus a few extra items that are on my list to buy!
For my day pack I used my Osprey Kyte 36-litre and for the expedition I used my Osprey Ariel 65-litre backpack.
- Group shelter (big enough for everyone)
- Confidence rope
- First aid kit + personal one
- Warm layers, hat and spare gloves (for me)
- Spare hats and gloves (for the group)
- Food and water
- Map + compass (plus spares)
- Phone + battery pack
- Head torch plus a spare one
- Waterproof jacket + trousers
On my list to buy
There are a couple of items recommended by Paul that I am going to add to my kit
- GPS
- Blizzard jacket – (3 layer one-size jacket)
- Emergency bandage (large size)

Other useful kit for your Mountain Leader Assessment
As well as the all important kit that you’d pack for a day hike here are a few other items that I found useful prior to, on my assessment and will subsequently be used afterwards too!
- Stopwatch – During much of my training I used either my phone or Suunto watch to measure time. However, these options aren’t practical if the weather is awful. This is the stopwatch I used, it has large buttons and a big screen, plus it didn’t cost much!
- Pens to write on your Active maps – Great for marking your journey when are on your assessment, I used these a lot during the night navigation! Order from Amazon here.
- Carabiner clips – Ideal for attaching things to your backpack, whether it’s your gloves, compass or stopwatch, they are perfect to keep essential items close to you and not blow away in the wind.
- Timing beads on a shoelace – for ages I wondered where people got these from, then I realised it’s simply a shoelace and some cord toggles. I ordered mine from Etsy.
- Timing cards – here’s something for you to create yourself, get it laminated or pop into a waterproof case.
I hope you’ve found my journey of becoming a Mountain Leader useful. If you have any further questions then please feel free to get in touch and I’ll be happy to help. The best place is via Instagram @beckythetraveller but you can pop a comment below too.
Good luck on your Mountain Leader journey and maybe I’ll see you in the hills soon!
Thanks for taking the time to write this Becky. Very useful info and I like the way you have been honest about your nervousness etc. I’m a 62 year old who should have done this 30 years ago and never got round to it! Assessment end of August. Thanks again!