Are you looking for the best lightweight tripods for hiking or backpacking?
Travelling solo is awesome but when you’re visiting new cities or hiking in remote locations, maybe out walking in the gorgeous Peak District or up a mountain in Snowdonia, a tripod is the best way of capturing the photo.
Here are my two tripods I use for my hiking and backpacking adventures in the UK and trips abroad.
Both tripods have been with me on numerous adventures from summiting Scafell Pike in the Lake District to my regular weekend trips to the Peak District. I will share why they are the best lightweight tripods for your trip.
Plus a few top tips for taking photos of yourself when hiking alone.
My camera is a Nikon 3300 SLR which I use with a Sigma 10-20 mm lens. Both combined it’s a pretty heavy piece of kit so it is important to carefully consider what tripod to buy for my travels.
*Becky the Traveller participates in the Amazon Services Associates Programme, as well as other affiliate programmes. If you make a purchase through these, I earn from the qualifying links. This is at no extra cost to you. Read more here.
My two Best Lightweight tripods for Hiking + Backpacking
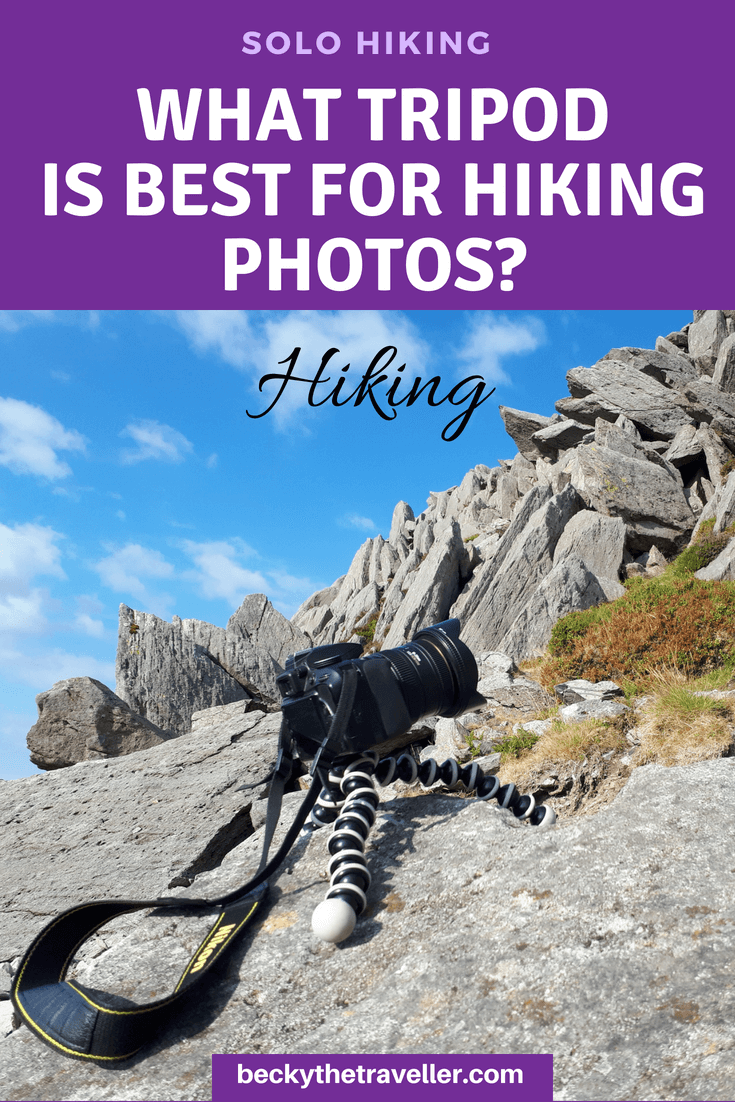
Tripod no. 1 –Joby GorillaPod SLR-Zoom Tripod

I originally had the smaller Joby GorillaPod Original Tripod but upgraded to the larger model when I bought my SLR. The mini one is perfect if you have a compact camera but for an SLR you’ll need the larger one!
It’s claw-like tripod legs are great for gripping rocks, branches or even fences. Giving you many options to take that solo photo whilst hiking.
How much does the tripod weigh? 340 grams
How much does it cost? £38.42* (or £18.86 for the compact camera smaller version)
Why do I think this is the best tripod for hiking + Backpacking?
- It’s lightweight, always a bonus, you don’t want the extra weight when you’re hiking.
- Easy to attach to straps on the outside of my rucksack
- Perfect for rocky terrain on your hikes
What don’t I like about it?
- For some shots, if you can’t find something to give extra height it can mean you can’t take the exact photo you want (ie too low)
- You also need to crawl around on the ground to set the shot up
- Vertical shots are more difficult to set up (but not impossible)
- It is a little expensive but I have had both my Gorilla Tripod several years and it’s still going strong
Click here to order your tripod now from Amazon (SLR or Compact Camera options)
The first tripod is for SLR cameras and the second option is for compact camera users.
Tripod no. 2 – AmazonBasics Lightweight Tripod

The Amazon Basics was the second lightweight tripod which I bought for my hiking and backpacking trips. It was after my trip to Iceland when I borrowed my travel buddy’s tripod numerous times for some of the waterfall shots on the trip.
The tripod has easy to adjust legs so you can quickly set up.

There’s also a mini spirit level to help you line up your photos straight, saving on valuable editing time afterwards!
Plus it comes in a bag so if you’ve stuck the tripod legs in mud or dirt then it doesn’t make too much mess in your bag.
How much does the tripod weigh? 570 grams
How much does it cost? £13.99*
Why do I think this is the best tripod for hiking + backpacking?
- It’s lightweight, always a bonus, you don’t want the extra weight when you’re hiking.
- All the legs are easily adjustable so you can shorten to according to the ground (for example if you’re hiking up or downhill!)
- Bargain, so cheap!
- Easy to twist or change the tripod from horizontal to vertical shots
What don’t I like about it?
- Because it’s a lightweight tripod, it’s not brilliant in windy conditions.
- To counteract that I have a small clip on my rucksack which I attach to the tripod, acting as a weight (see photo). So far I’ve not had a problem!
- At 50 cm high sometimes it’s not quite high enough for the angle I want, but most of the time I can find something that works for the photo.
Click here to order your tripod now from Amazon
How do I take my solo photos when hiking and backpacking?
Remote clicker for the tripod
I’ve given the game away with my two top tripods that I take hiking and backpacking with me. But I have one more piece of equipment that I love for taking solo photos. My camera has a 10-second timer which is great for some shots but most of my photos are taken with my remote clicker.
On my Nikon 3300 SLR, I have a few options to take photos, from a single shot, continuous and also a delayed remote option.
This is basically a 2-second delay to give you enough time to move your arm from pointing at the camera to a nice candid pose!
Read next: 25 Best Places to Visit in Wales


This is the Wireless Remote Control for my Nikon camera it is compatible with the following Nikon cameras (P7000, D3000, D40, D40x, D50, D5000, D60, D70, D7000, D70s, D80 and D90 Digital SLR Cameras).
Or if you’re a Canon user then this is the Wireless Remote Clicker for you. Looks exactly the same but seems to be cheaper. I guess that means Nikon is the best haha!
Top tips for taking solo photos whilst hiking

7 Photos + tips I’ve taken with my Tripod
Click each link below to see what photo I took using each technique on my Instagram @beckythetraveller!
- Buy yourself a tripod (see above hehe)
- And don’t forget that remote clicker to save you running backwards and forwards to capture the photo
- Or for distance shots use the 10-second timer
- Jumping shots with the remote clicker are possible but it may take a few attempts!
- Find a hiking buddy (ok technically cheating but you could still do this)
- Ask a stranger, you might need to give them a few pointers regarding your photo composition. Don’t get too technical, just say where you want to be in the photo (for example, to the left of the shot)
- Go for the hiking boots only shot. I love these and they give a great perspective of your view too
Hiking Tripods for your phones
Do you have any more questions about either of the tripods I use for hiking and backpacking?
Or maybe how I set up my solo photoshoots! Ask me in the comments below.
Save this to your Pinterest hiking gear board