
One of my first jobs on Dennis (my van) was my insulation, firstly, that’s because how it works with a van and secondly, I wanted to do a few trips away and since it was still winter/early spring in the UK I wanted to be warm.
Before I fitted my sound deadening and insulation I opted to have two windows fitted by a professional to my van, I’m glad I did these before the insulation as metal filings can get everywhere and although Sarah did a fab job of cleaning up afterwards it was made more sense to do it this way round. You can see my windows being fitted in my last post on removing the panels and bulkhead (scroll to the bottom to see the windows going in).
Here I will share the research I did regarding campervan insulation and what lead me to make my decision for my insulation choices. If you’ve just started following my progress either on YouTube or maybe from my Instagram (@beckythetraveller) you’ll know I’m no expert but this is a real beginner guide for anyone looking to convert a campervan so I hope whatever your experience you’ll find something useful in this post.
Pop any questions or tips in the comments below about my insulation choices or techniques
What’s the best insulation for campervans?
There’s an abundance of information about the best insulation for campervans out there, so a lot of my choices were based researching what was right for me, based on my skill level for fitting and also my budget available.
Here are a few of the different types of insulation available:
- Insulation boards
- Thermal rolls
- Foam spray
- Fluffy loft insulation
But which one do you pick?
Your decision on insulation will initially be based on the type of van you have. For example, insulation boards look a great option, however, for a small van conversion it might not be the best choice. You’d need to create a framework to place the insulation boards into (that’s what the ones I’ve watched have done), which then would reduce the headroom available in your van.
Foam spray looks like it would be great, getting in every single small gap but after watching a few YouTube videos I decided it was not for me, in fact, many people do opt for a professional foam spray job because it’s really that messy.
There’s then rolls of insulation, some with sticky backed glue that you simply peel the paper and stick on your van, there’s other rolls that you need to use adhesive spray to secure in place. And then the fluffy insulation which looks great.
Here I’ll explain which insulation I used for each part of my campervan, mission, to keep ‘Dennis’ lovely and warm 🙂
Campervan Sound Deadening
But first let’s talk about sound deadening and whether you need it?

Do you need sound deadening?
Until I started my van conversion I didn’t even know sound deadening was a thing, call me naive but this is my first van conversion and it’s never come up in general conversation before.
I didn’t do loads of research into this topic, it genuinely seems like everyone who does a van does some form of sound deadening, from those professional companies that have offer a full fit of sound deadening and insulation to all those many DIY van conversion (wannabe experts) hehe!
As soon as I removed all my plywood panels and the bulkhead the noise of the van during normal driving was apparent, all those speed bumps or potholes caused even more noise and rattling of the metal, that was noisy even with the music on.
And for a quick test, I did a before and after (fitting sound deadening) by tapping on the inside of my van panels and the difference speaks for itself. From a tinny metal nose, the sound deadening dulls the sounds. It’s not silent but it is definitely a noticeable difference.
So, my short answer to this question is YES!
What did I use to sound deaden my van?
I started my research watching James and Sarah, who’ve converted a Mercedes Sprinter (and done an awesome job) from The Whole World or Nothing. They opted for sound deadening sheets, for there Mercedes Sprinter (large van) they had ordered 30 sheets so I figured for my Vauxhall Vivaro (a medium van) that 30 would be good for me too! That was the limit of my researching haha!
These items needed for fitting the sound deadening sheets, one of the easiest jobs to get you started!
- Sound deadening roller
- Large heavy duty scissors
- Hairdryer (to activate glue in sound deadening sheets)**
- Cardboard boxes (to use to create templates)
**I fitted mine on a warm day and rubbed my hands over them to warm them up.

Was 30 sheets enough for my Vauxhall Vivaro Mk3?
My van is a medium sized van, long-wheel based, approximately 2.5 m long by 1.4 m wide and 1.4 m high, to help you visualise and compare to your van.
I ordered these Silent Coat sound deadening sheets
Each sound deadening sheet measures 250 mm x 190 mm, which is slightly smaller than an A4 piece of paper and my sheets were 2 mm thick.
The instructions within the box suggest up to 50% of each panel is covered and for areas that have more noise, for example, the wheel arches they have 100% coverage. I adopted this suggestion (sort of).
I put one full sheet on every single panel inside the van, minus the two panels that I’d since had windows fitted in. For the wall panels, this was 4 on the side panels, 4 on the side doors and 1 on the barn doors, so a total of 9 sheets used.
The wheel arches, I decided to go with 100% coverage, although they don’t look that big they took 5.5 sheets each, so 11 in total. And finally the ceiling was comprised of 5 long panels, with a divided in the middle, so 10 panels in total. I used a full sheets on the 4 wide panels
- Side panels, side doors and back doors = 9
- Wheels arches = 11
- Ceiling = 10
Total = 30 sound deadening sheets for the van
Should I have ordered more? – I was being impatient at the time, as I wanted to get on with the next stage of the insulation but I feel happy with what I used on the van. The other factor to consider when ordering sound deadening sheets is the weight. My box of 30 sound deadening sheets weighed 4 kg!
I could have easily fitted another 10 sheets to the ceiling panels (photo below), but I opted to stick with what I’d done. My next layer of insulation I’d ordered also stated it acted as a noise reduction so I felt this would be enough for me.

How did I fit my sound deadening sheets?
This is nice and easily, the sheets are sticky on reverse, you simply need to warm each sheet up beforehand (either with your hands or a hairdryer), I did mine on a warm day so rubbing between my hands was fine. Then you peel the backing off and stick to each panel. Top tip – keep in your house beforehand so they are already warm.
For the side panels, both sets of doors and the ceiling, on each panel I used a full sheet, no need to cut. Then I used my sound deadening roller to ensure they were fully stuck down.

The wheel arches were fiddly, I initially stuck full sheets where possible and snipped triangle shaped section to ensure a smooth fit. I also made some cardboard templates for sections. Note – remember to reverse your template otherwise you’ll have the shape the wrong way round. Yes, I did this haha, but I managed to use on the opposite wheel arch.
It’s worth getting good scissors for this job, I bought these large heavy duty scissors and they’ve turned out very handy. I made a couple of cardboard templates for awkward sections, but the rest I just filled the gaps with all the off cuts. It’s not a perfect finish but as regards to sound deadening it worked!
Campervan Insulation
Do you need insulation in your van?
Another short answer here…YES!
Your van is essentially a metal box! Metal conducts both heat and cold, therefore when it’s cold outside your van will mirror the temperature. I started staying in my van during March in the UK, I had temperatures of minus 6 at night, maybe colder and I can confirm that insulation made a HUGE difference. I woke up one morning with ice inside my van on the exposed metal sections, but the insulated areas were a normal temperature to touch by hand.
What did I use to insulate my van?
Here is what I used to insulate my van walls, floor and ceiling. I’ll do a breakdown of what I used for each part of the van but here’s the overall list.
- Sound deadening sheets x 30
- Sound deadening mat roller tool x 1
- Recycled plastic insulation x 2
- Thermal liner 7 mm x 1 (10 metre roll)
- Super liner 6 mm x 1 (3 metre squared)
- Thermawrap x 1 (4.5 metre squared)
- Thermawrap foil tape x 2 (50 mm x 20 metre)
- Heat resistant spray adhesive x 2 cans (Order in bulk if you’re planning to fit 4-way stretch carpet)
Fitting my van insulation
I’ll break down my insulation into the three main areas I fitted it to – the side panels and doors, the floor and the ceiling.
Ceiling insulation
Part 1
I decided to start with my ceiling insulation for my van, because the panels were all straight and that looked like it would be an easy task to start with. I also thought it made sense to start cutting the roll into straight lines as I knew later on I’d need to cut different shapes to fit the awkward areas of the van.
For the ceiling insulation I used the Dodo Mat thermal liner, I used a tape measure to work out the size I needed for each panel and cut this with my heavy duty scissors. The van has a metal divider in the middle so the strips were roughly 1.25 metres long by 40 cm wide so an easy size to work with
First, I checked each shape fitted then I peeled off half the backing paper, stuck it in place before peeling off the other half. If I made a mistake, you could quickly pull it back off and reattach. My main issue was keeping in a straight line, even though I’d measured it straight, just 1 mm off at the start sends you off on a diagonal.
I did end up with a couple of little gaps but I filled these later on with some of the leftover pieces.

Part 2
My original plan for the ceiling insulation was the thermal liner and that was it. But after using the van on a couple of overnight trips I noticed how bad the condensation was in my van particularly on the ceiling where the exposed metal was collecting droplets of water.
Here’s where I came up with a Plan B for the ceiling insulation. I went back to researching van insulation, in particular ceiling insulation and found an option that would work for me. I opted for some ThermaWrap, securing with adhesive spray and some foil tape to fill in the gaps.
How much insulation did I use for the ceiling?
For the ceiling of my Vauxhall Vivaro Mk3 I used approximately 2.5-metres of thermal liner insulation, less because I was filling the panels in the ceiling and not covering the entire area. Total = 2.5 m2
And when I added the ThermaWrap as part of phase two of the insulation, I bought two rolls of insulation (600 mm x 7.5 m) as I planned to use elsewhere for my window cover. I used about two-thirds of one roll and I also bought two rolls of tape (50 mm x 20 m), I wasn’t sure how much I’d use but it turned out it was less than one roll foil.
In summary, I bought too much insulation, but I do still want to any some insulation under the headliner and I’m also going to use the ThermaWrap to make some window covers for the front and side windows. And the foil, well, I ended up using that elsewhere.
Side panels and doors insulation

Part 1
For my side panels and four doors I used the same two items for my van insulation – Dodo Mat thermal liner and recycled plastic loft insulation
I started with the thermal liner which came on a 10-metre roll and I used a tape measure to roughly work out the size I needed for each panel and cut this with my heavy duty scissors. Once I had a smaller piece to work with I found the best technique was pushing the thermal liner into the curved corners, bending it down then cutting to create the shape. Again, this didn’t need to be perfect but I was aiming for maximum coverage.
Once I was happy with the shape, I peeled off half the backing paper, stuck it in place before peeling off the other half. If I made a mistake, you could quickly pull it back off and reattach.
Where possible, I tried to use full pieces of thermal liner for the panels, which was fine for the upper (nicely shaped panels) but this became completely impossible for the lower door panels and lower side panels. In these instance, I measured out the shape with a tape measure but often ended up cutting the piece in half or thirds to be able to manoeuvre it into place.
I also kept all the odds and ends so I could use every bit of the thermal liner on any odd places once I’d done the large sections.
Part 2
Once I’d fitted all the thermal liner I then moved onto my second layer of insulation – the recycled plastic loft insulation – I researched a few places, the cheapest option ended up being from B&Q, with an R value of 2.25 m2k/w. There’s a similar product that Dodo Insulation do but this is almost double the price and in my opinion looks the same.
The technique for fitting this is to open the roll up and let it expand first. Then simple tear and shove, that’s the Becky technique, but it’s really the best one. The idea is to not overfill all the spaces but allow the loft insulation to fluff out allow air to trap in-between the layers therefore creating your insulation.
Initially, I planned to secure this with spray adhesive but after filling a few gaps it wasn’t necessary as it held in place as it was.

How much insulation did I use for the side panels and doors?
I ordered the 10-metre roll of Dodo Mat thermal liner insulation (x 1-metre wide), for the side panels and doors I used roughly used 5.5 metres to cover the side panels and doors, this didn’t include the two panels that I swapped for windows. Total 5.5 m2
To fill all the gaps/panels in my van I used two and a half rolls of loft insulation, each roll covers 2.22 m2. I bought two rolls and I had a friend that had some spare which is why I only needed to buy two. Total = 5.5 m2
Leftovers
After the ceiling, walls and doors were done I had 1.5 metres of Dodo Mat thermal liner left, I could have put additional insulation over some of the gaps, in fact, I did do this with some of the small leftovers. But I had plans for this last bit of insulation – make my own window covers (I’ve already made one so I’ll share how I did it in another post).
Floor insulation
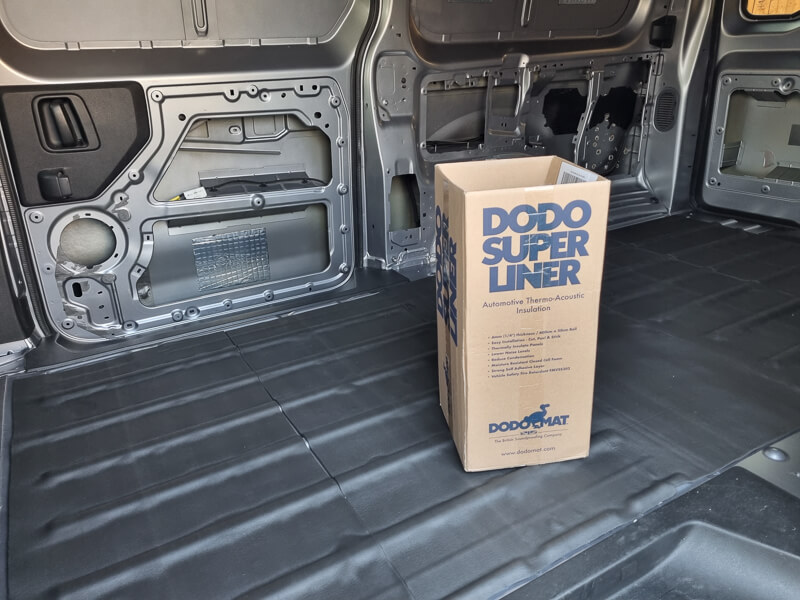
For the floor insulation, I used a different product another one from Dodo Mat but this was recommended for floor insulation Super liner 6 mm. It was also sticky backed, so again no other materials needed to fit it, other than my large scissors to cut it to size.
I’d read that it was best to fit the super liner width ways as it’s easier to fit over the bumps in the floor instead of doing length ways. This was good advice, I could see how doing length ways would be really awkward.
I also researched that you needed to measure and cut extra to allow for the bumps, I added about 30 mm to my first measurement, which was slightly too but but better being that way than too short.
One thing I’d not factored was the stickiness of the floor insulation, having fitted the sticky insulation from Dodo Mat on the walls I assumed it would be similar, being able to lift back up and adjust if I made a mistake. This was 100% not the case. The Super liner really was super, it stuck so quickly so the technique was pull a small amount of backing paper off each time and smooth into place over each bump.
Top tips
- Go slow and take your time, you’ve literally got one chance to get it right.
- Try to keep in a straight line, harder when you go to add the second layer as you want there to be minimal gaps in between.
- Cut with scissors but with backing paper on, if you try to trim within backing paper it’s a nightmare (speaking from experience!)
How much insulation did I use for the floor?
The Dodo Mat Super liner came as a 6-metre roll, measuring 500 mm wide, therefore covering a total of 3 metre squared. I’d roughly in my head thought it would be enough, but in reality it came up a little short for my van. In hindsight, my van measures 2.5-metres x 1.3 metres so I failed on the maths there!
I have planned to add another type of insulation in the gaps but I’m yet to work out what’s right. It’s too expensive to buy another roll when I’d only be using 1-metre at the most. Watch this space for an update.
- Tape measure
- Sound deadening roller
- Large heavy duty scissors
- High temperature spray adhesive
- Sharpie permanent marker
- Cardboard to use to make templates for awkward spots
DIY Van Conversion Tool list
For all the tools I’m using for this van conversion you can see the full list here.
What tools do you need for sound deadening and insulating your van?
Here’s my complete list for adding the sound deadening sheets plus fitting the wall, ceiling and floor insulation
- Sharpie permanent marker
- Rubbish bag
- Head Torch (if doing in the evenings)
- Tape measure
- Sound deadening roller
- Large heavy duty scissors or Stanley knife
- High temperature spray adhesive
- Sharpie permanent marker
- Cardboard to use to make templates for awkward spots
How much did it cost?
For my entire van conversion I’m keeping track of the costs on a separate post – you can read how much I’ve spent so far here.
How Much Does A Campervan Conversion Cost? (Vauxhall Vivaro Mk3 LWB)
How much did the sound deadening cost?
Materials
- Sound deadening sheets x 30 from Ebay – £34.99**
Tools
- Sound deadening mat roller tool from Ebay – £8.79
How much did the insulation cost?
Materials
- Recycled plastic insulation rolls x 3 from B&Q – £29.00 (£5 discount with signing up for mailing list)
- Thermal liner 7 mm (10 metre roll) from Amazon – £129.99
- Super liner 6 mm (3 metre squared) from Amazon – £44.99
- Aluminium foil (50 mm x 45 m) from Wickes £7.50 + 2 rolls from Toolstation £tbc
Tools
- Tape measure (5-metre) from Amazon – £4.00
- Heavy duty scissors from Amazon – £11.49
- Sharpies x 2 from Amazon – £2.00
Overal costs
Since you may already have the tools for the job, or you’re able to borrow them here’s the breakdown of the sound deadening and insulation materials and the tools.
Materials – £34.99 + £211.48 = £246.47
Tools – £8.79 + £17.49 = £26.26
Total costs – £238.97 + 26.26 = £272.73
Next jobs
And the next step is sorting the van walls, ceiling and floor. This will be a mix of carpeting, cladding and vinyl flooring. There’s going to be lots to do during this stage so I feel it may take a while!
This is the procedure that coombe valley campers demonstrate also but it’s not clear what to do after that. If you use the fluffy bottle insulation in to of the second silver layer.. What goes directly on top of that?
Also what did you do with the floor once you laid the dodomat?
Thanks..
I finished my van walls with cladding so I added a frame and fitted to that, I’ve seen people but plywood panels on. For the floor, I added a plywood panels, then a vinyl flooring on top :). I hope your conversion is going well 🙂